BALMUDA The Toaster brings out the best in any kind of bread.
Simply follow the 4 steps below.
Open the door and place the bread in the middle when a single slice only, If more than one, spread them out evenly.
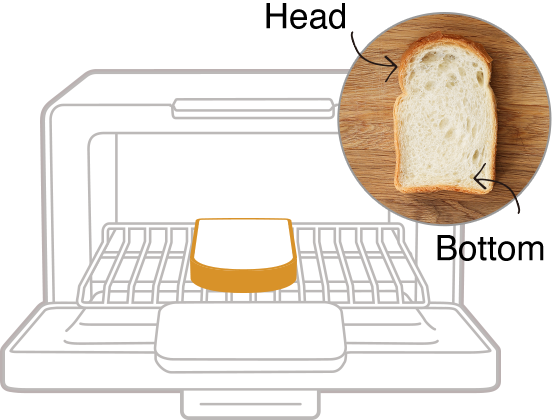
A slice of bread has its “head” and “bottom”. The head of round top bread is the round top. The head of rectangular bread is the top surface while the bread is in the package. If you put this “head” to the front, you can toast the bread evenly.
If you're toasting a single slice, place it in the center. If more than one, spread them out evenly.
The distance between the toasting rack and the heater tubes is around 7cm. If the heater tubes is too close, it will burn, so limit the thickness of bread to 5.5 cm or less. The bread will create sugar and oil on the toasting rack, please be careful, it is easy to burn.

Before each use, pour 5cc of water into the water inlet using the special cup. Skip this step if using Classic mode.
Whatever kind of bread you're toasting, and however many slices you're toasting at once, always add the same 5cc of water.
Don't add water in Classic mode
In Classic mode, steam isn't used, so water isn't needed. Adding it can cause buildup in the boiler and lead to a malfunction.

Each mode uses a different heating method. Read on to learn which mode is right for which kind of bread.
Heats both sides of the bread evenly at a moderate temperature. Recommended for thin slices and everyday sandwich bread.
Heats at a high temperature, especially on top. Recommended for sliced bagels and toast with toppings to give a crisp, golden brown finish.
Heats at a moderate-to-high temperature. Recommended for thick slices and fresh bread with high moisture content.
Heats at a moderate temperature without browning. Recommended for bread that you just want to warm up, such as croissants, rolls and baguettes.
Heat is regulated to reach the desired temperature without the use of steam.
Heat is regulated to reach the desired temperature without the use of steam.


Press the power button on the right side to switch the toaster on, and then turn the dial clockwise to set the timer. After this, just wait for your delicious toast to be done.
Even if you are toasting thicker bread or more slices, you don't need to add extra time. Check the recommended times and experiment to find the timer setting that gives the results you prefer.
The changing temperature inside the toaster is precisely measured and automatically adjusted by switching the heater on and off. This precision lets the toaster give any kind of bread the same toasted finish in the same amount of time, from thicker slices that are hard to warm up to thinner slices that warm up quickly.
Put slices in the toaster frozen and add an extra 1 or 2 minutes to the timer.
Freezing bread preserves its flavor better than refrigerating it. We recommend freezing any bread you don’t eat on the day it was baked.

Clean the crumb catcher after every use, and clean the other parts when build-up becomes noticeable.
The crumb catcher, toasting rack, and boiler cover are removable.
